Sylexus44 Posted January 11, 2009 Author Share Posted January 11, 2009 This Tut was created for the purpose of teaching my mappers in my team how to tut, but WTH. Might was well post it hereHere are some examples i've come up with (pay attention to the things outlined in red, they're explained underneath in order):The good: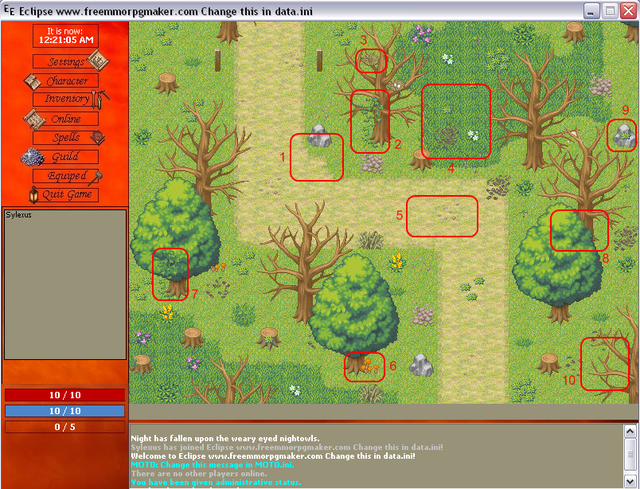1- roadside, good ground transition2- vine technique on tree3- Bird's nest adds detail4- stuff on grass is good5- adding small pebbles and dust is good detail6- FUNGI DO GROW ON TREES7- using a technique multiple times on a map is ok as long as it's not overused8- tree coverings make forest effect9- Yes, shrubs can grow on rocks10- Somethings sticking out of the next map is fine as long you plan to make them transition properlyThe bad: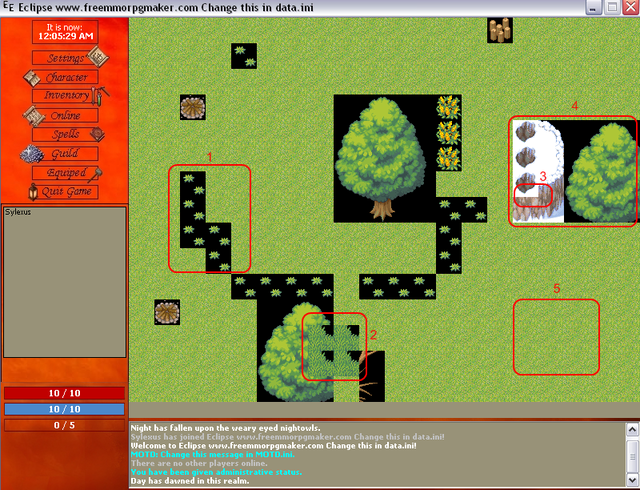1- COMPLETE CRAP!!! never have black spots like that. not to mention it's too repetitive and close to eachother2- the definition of stupidity3- no cliff transition4- makes no sense, and tree is missing trunk5- same old boring groundThe ugly: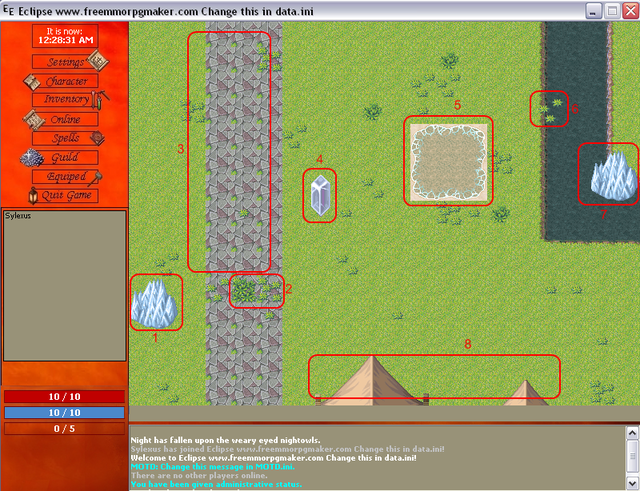1- Does this make sense whatsoever?2- grass and shrubs on that road?3- Road is too straight, and has no transition with the grass4- WTH?5- A beach? right there? NO6- those shrubs are defying the laws of physics7- This works. IF IT WAS A COLDER MAP!!!8- This would be ok to place tents like that as long the map transition was proper, but they're too close togetherNow for you to start learning everything, the maps above probably have provided you with good do's and don'ts but now you need to know how to do them.Here's the mapping panel and the descriptions for each part of it: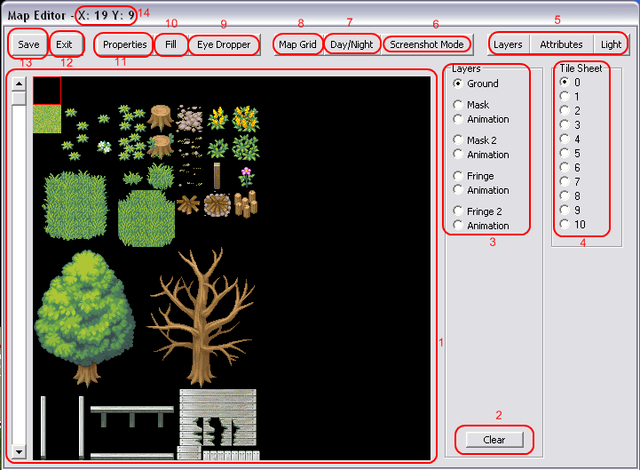1- Tiles: these are what you use to give your map graphics2- Clear: clears everything3- Layers: explained below4- Tile sheets: 0-9 have the graphics, 10 is only for lighting (you're not restricted to one tile sheet on a map)5- Layers, Attributes, Lighting: talked about later6- Screenshot mode: Nothing appears on the map except the tiles. press f12 in this mode to take a screenshot of only the map7- Day/Night: change day to night or vise versa to check your lighting8- Map Grid: Places a handy grid on the map (ALWAYS USE THIS IF YOU WANT TO BE PRECISE)9- Eye Dropper: Copy 1 tile on the map for placement10- Fill: Fills the map on the selected layer with the selected tile. Use this and select a pitch black tile on a layer to clear that layer11- Properties: Maps adjacent to this map, Map music, Name, type of map, indoors/outdoors, NPC's, and spawning can all be changed here12- Exit: NEVER DO THIS WITHOUT SAVING FIRST UNLESS YOU NEVER WANT TO SEE YOUR MAP AGAIN13- Save: do this often14- X & Y coordinates: shows what coordinates your cursor is onHow to start out:Press F1 then go to Edit and press Map EditorThe Editor will pop up, all you have to do is understand the basics of it that are taught above.To place an Attribute, Lighting, or Tile just click it in the Editor then click on the MapNow we'll talk about layers, as seen above there are 5 layers (they're listed below in order). Layers are… well... LAYERS!!!all maps have different layers, every tile is placed at a layer, your character appears over every layer up to Mask2, and under both Fringes. Layers are important because they're what adds detail to your map. You can have up to one of every layer on one single tile, usually the best maps have every layer on every tile filled with something (not always of course).(since animation is on the same layer as the layer it's animating, it just blinks the animated tile back and forth) ALWAYS REMEMBER pitch black turns up invisible on any layer except groundPicture layers like this in a vertical view they would appear like so (ive given examples of what you would put on that layer):Top------------Fringe 2 (example: Bird's nest)------------Fringe (example: tree limbs)------------Player stands here------------Mask2 (example: lower tree trunk)------------Mask (example: grass or shrubs)------------Ground (example: soil [mostly anything that doesn't have black on it])–----------BottomYou can save yourself more layers to put detail on by using your layers wisely. Such as instead of putting grass on Mask2 just because you're in a rush, put it of Mask so you can put other things on top of it to add detail, otherwise you'd have to use fringe or higher to cover it but it would cover the player too.Next we talk about attributes:here's the chart that shows each one: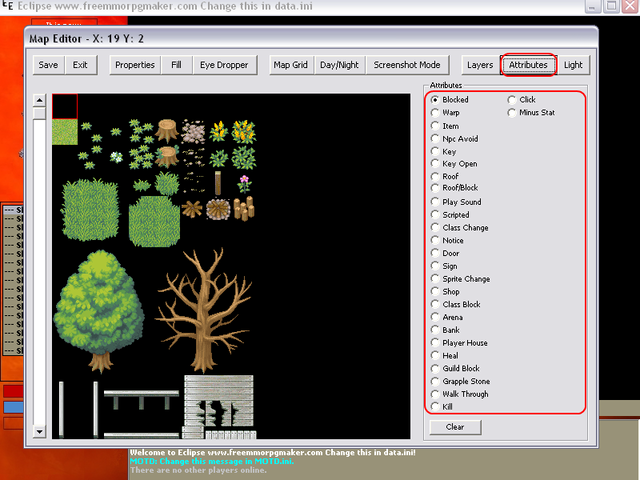Blocked: Prevents Players and NPCs from walking on that tileWarp: You enter an x and y coordinate and a map # then set it, when the player steps on it they warp to that locationItem: Places an item on a tileNPC avoid: Prevents NPC's from walking on a tile, but players can still walk on itKey: Places a key on the mapKey Open: A blocked tile unless a player steps on it with the key neededRoof: Used on Fringe 2 tiles to make them appear normally until the player walks under a certain area with the same ID as the roof, then the Fringe 2 layer dissapearsRoof/Block: Same as roof but players cannot walk on itPlay Sound: <- self explanatoryScripted: Can do anything depending on the chosen scriptClass Change: Will change the player's class when they step on itNotice: Gives a message in the chat barDoor: not quite sureSign: press enter to read it, text will appear in chat barSprite Change: changes the player's spriteShop: sets a shop on the mapClass Block: blocks up to 3 classes from stepping on the tileArena: buggedBank: sets a bank on the mapPlayer House: set on a tile, when the player steps there they will be offered the amount of currency for it, if they buy it, it becomes theirsHeal: heals you 100% when stepped onGuild Block: uselessGrapple Stone: allows grapple hook to work on itWalkThrough: allows multiple players to be on the same tileKill: instant kill to whoever steps on itClick: obviousMinus Stat: it lowers your statsNow we're on to the final thing: lighting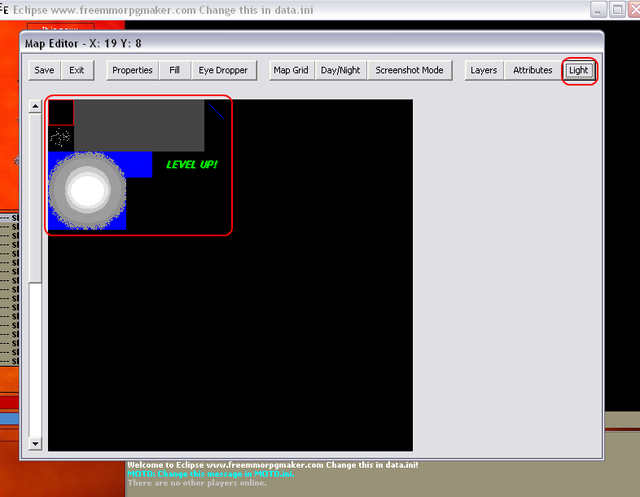Lighting is simple, it's like layering, you just lay down the light and at night it'll appear in game, dont mess up this tile sheet though since it also holds the level up and chat bubble graphics.Some extra notes:Make sure your maps properly transition and connect to eachother. Take screenshots and put them together to check if you placed things properly next to eachother on both sides.THERE IS NO UNDO BUTTONNEVER HAVE MORE THAN ONE PERSON WORK ON THE SAME MAP AT THE SAME TIME!!!, if one of them saves, then the other one's work is GONE!Never walk or warp into another map while mapping (even by accident) anything not saved on your map will not be there when you get back.Right click to remove attributes, lighting, or tiles on the selected layerYou can hold down on shift then press on the top left tile of multiple tiles and drag down to select multiple tiles at onceK, so now you know everything you need to know to begin with, so let's do this step by step:Let's start with a ground layer: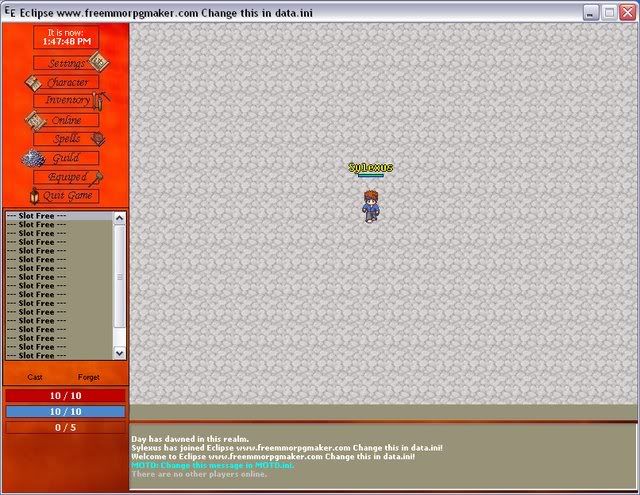Now add the masks (Mask2 was forgotten by accident, but you can see them in the fringe one):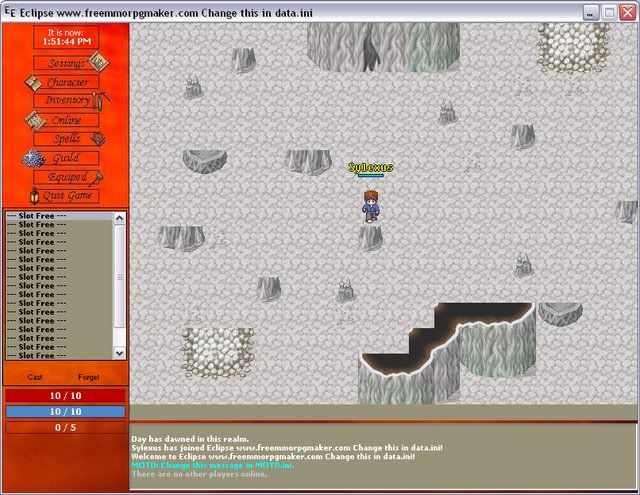Fringe (see how it goes over the character?):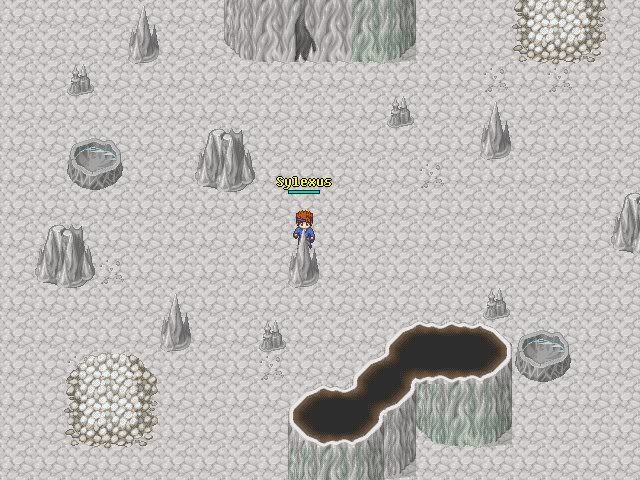Fringe 2: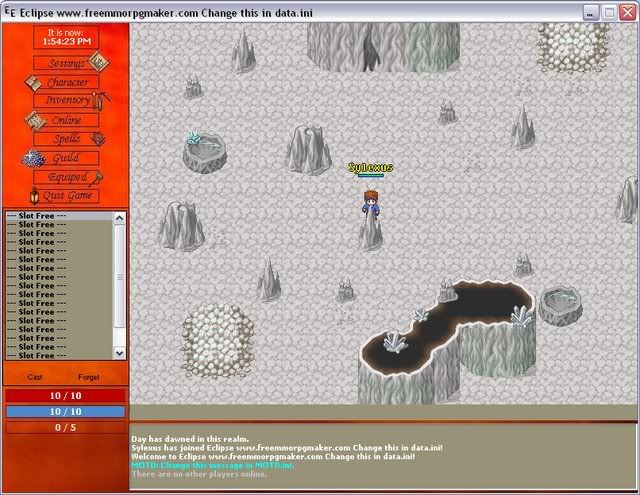Then go back and add detail: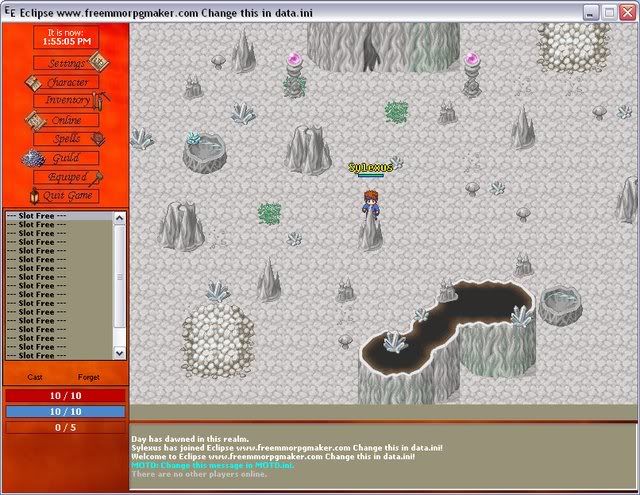WALLA!!! naw, it's not that great but it's for educational purposes.I wish you all good luck now with your mapping, I hope this waste of my life is somewhat useful to you but I sorta doubt it.GL Link to comment Share on other sites More sharing options...
Sowtis Posted January 11, 2009 Share Posted January 11, 2009 lol, i laughed…But yeah, this may help some mapping newbiesI'm not the best, but I'm not a newbie. Link to comment Share on other sites More sharing options...
Marsh Posted January 11, 2009 Share Posted January 11, 2009 Good show of the basics. Link to comment Share on other sites More sharing options...
Sylexus44 Posted January 11, 2009 Author Share Posted January 11, 2009 @Nexus:> lol, i laughed…> > But yeah, this may help some mapping newbies> > I'm not the best, but I'm not a newbie.Lol so you read it? glad you laughed.Hope it helped you a bit though@Marsh:> Good show of the basics.thanks, I hope to make a more advanced one for 3.0 when that's released. This one could be considered global mapping. Link to comment Share on other sites More sharing options...
Techno 5.0 Posted January 11, 2009 Share Posted January 11, 2009 nicely done :)it was interesting and hopefully this will help out the newbs Link to comment Share on other sites More sharing options...
Sylexus44 Posted January 12, 2009 Author Share Posted January 12, 2009 @Ninja-Tech:> nicely done :)> it was interesting and hopefully this will help out the newbsthanks, hopefully it'll also help the idiots who "Work" for me Link to comment Share on other sites More sharing options...
LIlCheatah Posted January 12, 2009 Share Posted January 12, 2009 This will help many many newbies. ;) Link to comment Share on other sites More sharing options...
jna Posted January 12, 2009 Share Posted January 12, 2009 Very good Sy, this will really help new people. Link to comment Share on other sites More sharing options...
Niko Posted January 30, 2009 Share Posted January 30, 2009 added to tutorial sticky! Link to comment Share on other sites More sharing options...
Sylexus44 Posted January 31, 2009 Author Share Posted January 31, 2009 @Niko:> added to tutorial sticky!"Sy's tutorial suddenly turns into a sticky post and sings hallelujah""Sy watches in amazement" Link to comment Share on other sites More sharing options...
Cadh20000 Posted February 6, 2009 Share Posted February 6, 2009 I just started with this today and am already about ready to give up. :angry: The only way I can get ANYTHING to show on my map is to "Fill" the whole map with it, how do you go about adding other stuff? clicking doesn't work, "Eye Dropper" doesn't work. Nothing I try except "Fill" has any effect on the map at all! :confused: Help please! I don't need help getting stuff to look good, I just need help getting ANYTHING on there at all except a solid field of the same tile over and over again!I used to use RPGMaker2000 and the map creation bit looks virtually identical but nothing except the Fill works that worked in RPGMaker2000\. Thats what makes this so frusterating. Link to comment Share on other sites More sharing options...
Alster Posted February 6, 2009 Share Posted February 6, 2009 There's no reason for the editor not to work. What version are you using. Also make sure you're using it correctly.If Eclipse Evolution (EE) fails use Total Eclipse (TE). That's been tested and has virtually no bugs. Link to comment Share on other sites More sharing options...
Adrax Posted February 22, 2009 Share Posted February 22, 2009 thnks it helped me figure out what fringe was. Link to comment Share on other sites More sharing options...
Sylexus44 Posted February 22, 2009 Author Share Posted February 22, 2009 @Adrax:> thnks it helped me figure out what fringe was.Np, now use it well Link to comment Share on other sites More sharing options...
Alatar Posted February 22, 2009 Share Posted February 22, 2009 Pretty nice tut, this will really help everyone who take a view of it :) Link to comment Share on other sites More sharing options...
tkdkid4 Posted April 16, 2009 Share Posted April 16, 2009 I'm new to Eclipse and have been fuming over maps for the last week. I get how to design it and everything but what I don't understand is…WHY MY MAPS WON'T SAVE?!?!?! Everytime I click save it closes the editor (like it's supposed to) them *POOF* my map is gone! It's so frustrating!HAs anyone else run into this problem before? If so, PLEASE HELP ME!!!! :O Link to comment Share on other sites More sharing options...
ENIGMAX Posted April 17, 2009 Share Posted April 17, 2009 good content - sticky vote Link to comment Share on other sites More sharing options...
Soljah Posted April 17, 2009 Share Posted April 17, 2009 No more stickies in the tutorial section, we don't want it like it was. It's nicely organized in Niko's 'Must read tutorials' topic. Link to comment Share on other sites More sharing options...
OmgArtorious Posted April 17, 2009 Share Posted April 17, 2009 Lol great tutorial thanks, had a nice laugh aswell =D. Link to comment Share on other sites More sharing options...

Recommended Posts
Create an account or sign in to comment
You need to be a member in order to leave a comment
Create an account
Sign up for a new account in our community. It's easy!
Register a new accountSign in
Already have an account? Sign in here.
Sign In Now