

Gwen
-
Posts
3862 -
Joined
-
Last visited
Never
Content Type
Profiles
Forums
Calendar
Posts posted by Gwen
-
-
Thank you my dear!
-
Just curious.
Am I still an admin? I have access to this board, but my name is not red. I have access to the admin control panel, but i don't have permission on any of the pages. I saw there is an account waiting to be activated, and James was saying something about his account needing to be activated too, so i was going to see if that was the account waiting. But when i logged in to the ACP all of the pages were restricted.
Just wondering. :huh: -
Site Report
in News
How do you mark PM's a read? I have 2056 messages. I don't remember having that many messages. I thought i was pretty quiet.
Also is it possible to have a conversation stay in a single PM? It looks like each reply shows up as it's own new message, and my reply is not included so i have no idea what i said earlier.
* * *
Marsh.. you probably figured this out by now, but…
Did you find the setting in Options to change your default subscription method? You can change it to not subscribe to posts.
Also in your user profile there is manage subscriptions. You can get rid of the subscriptions there.
* * *
When I try to change my signature, it says my account is not activated. It's the same issue as James. -
Have tried updating your video card drivers to the latest version?
-
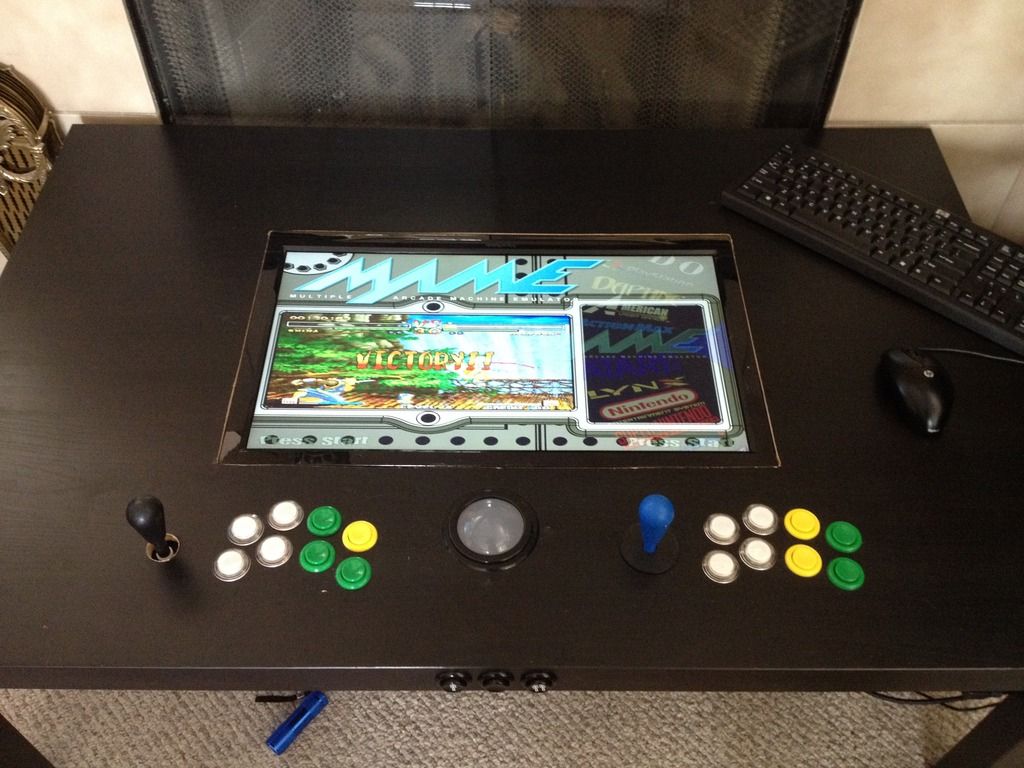
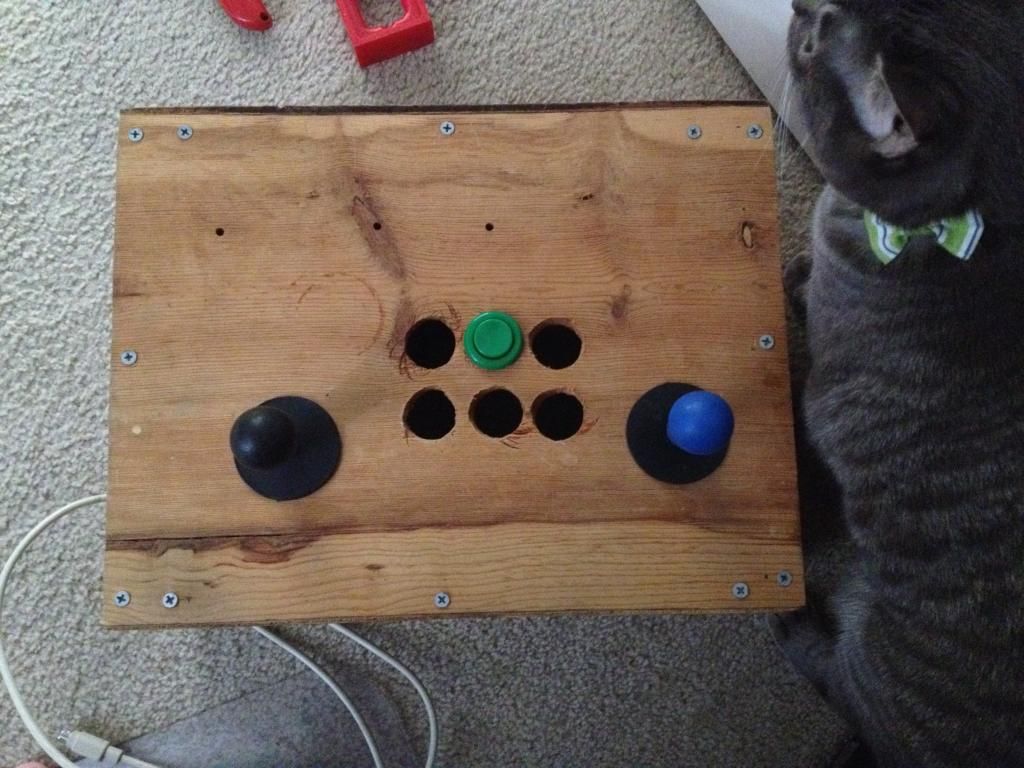
Ok so my table is basically finished. I was going to put plexiglass over the top of the table, but then i decided I was going to build a stand up system instead. While the table is cool, it just didn't function as practical as i hoped. Unfortunately led monitors don't have a good display when laid flat. I turned the monitor upside down, and it helped a little.
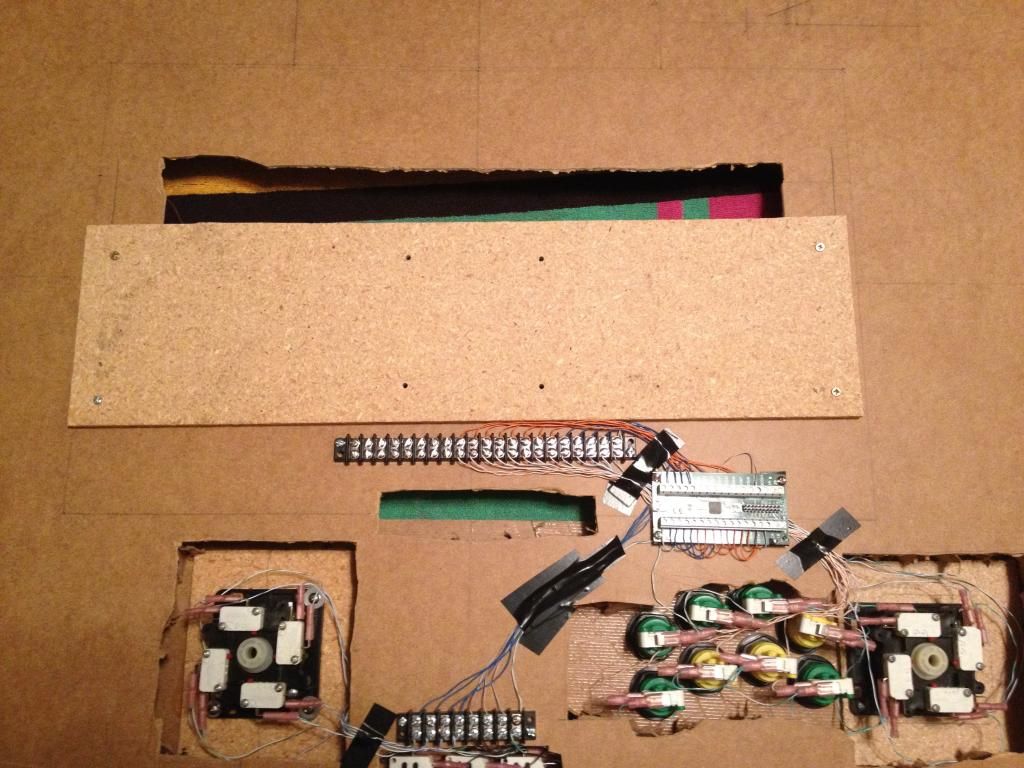
So here is what the mostly finished product looks like. All I need to do to fully finish the table is put the shelf on the bottom part of the table on, but i still access the components underneath so i have not put that on yet.
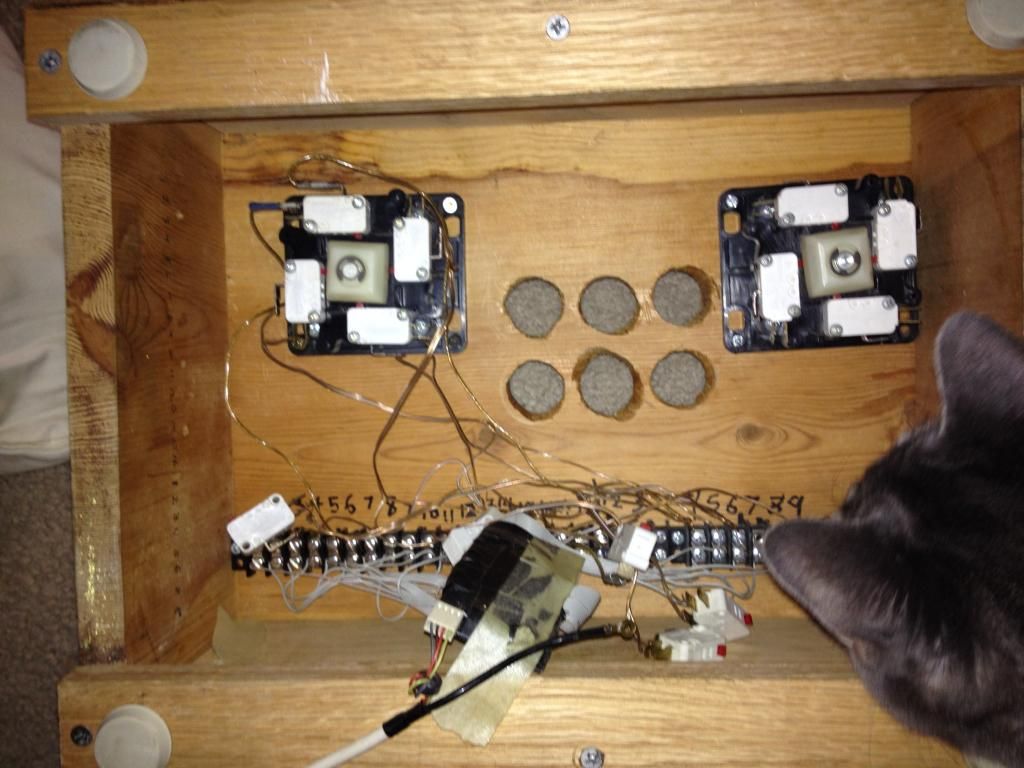
Here is the underneath of the table. You can see the computer and hard drive case to the right side. the big black box in the top middle is the trackball. I took an old computer case and hack sawed the casing off of it so it was just the motherboard tray and side. I was planning on putting a different video card in, but this computer didnt have the slots i needed. I have a bunch of extra parts and components laying around so this was kind of Frankensteined together.
>! 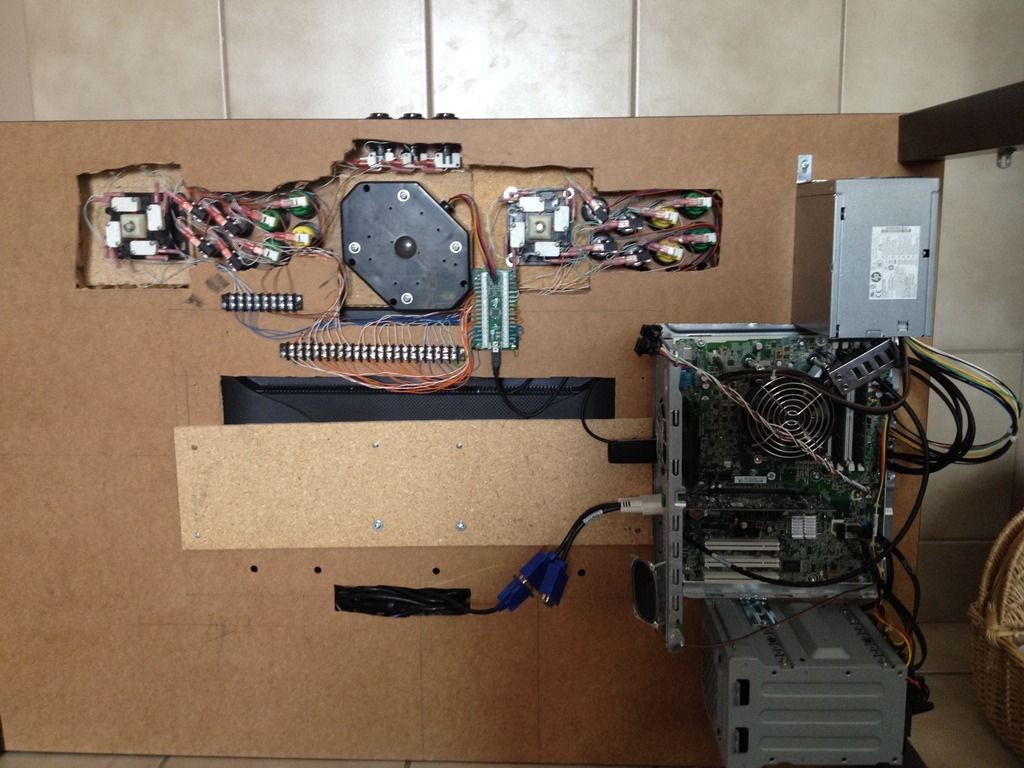
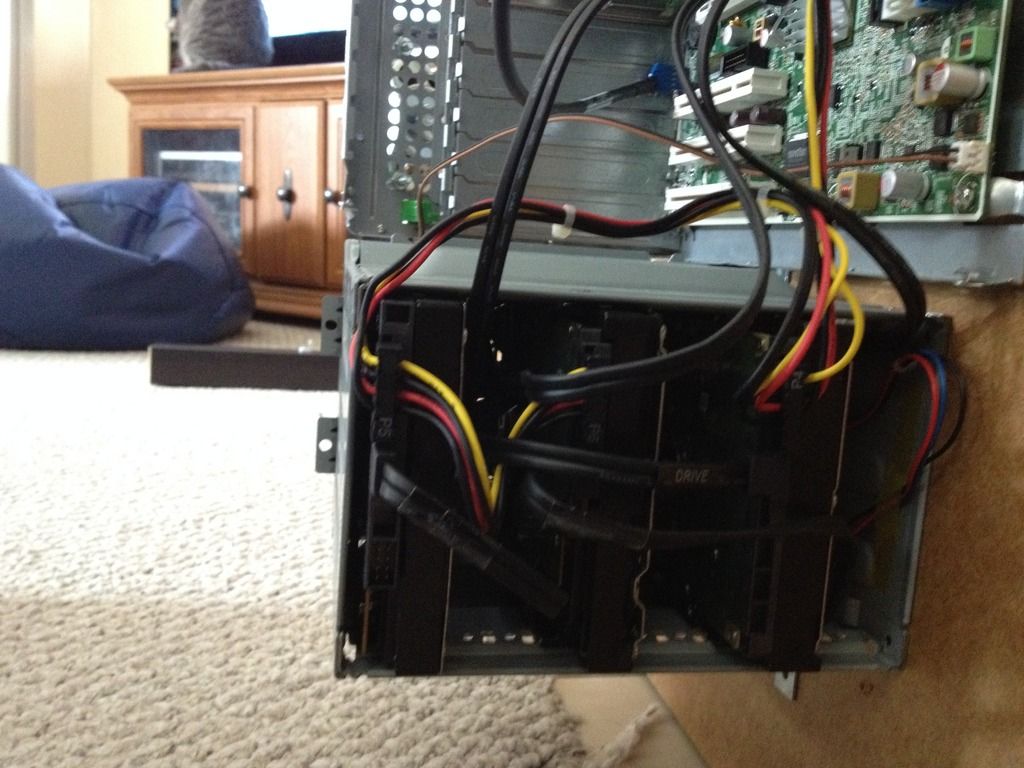
Here is the hard drive bay i stole from another old computer. I have 1 2TB drive, 1 1TB drive for storage, and a 250 GB for the OS.
>! 
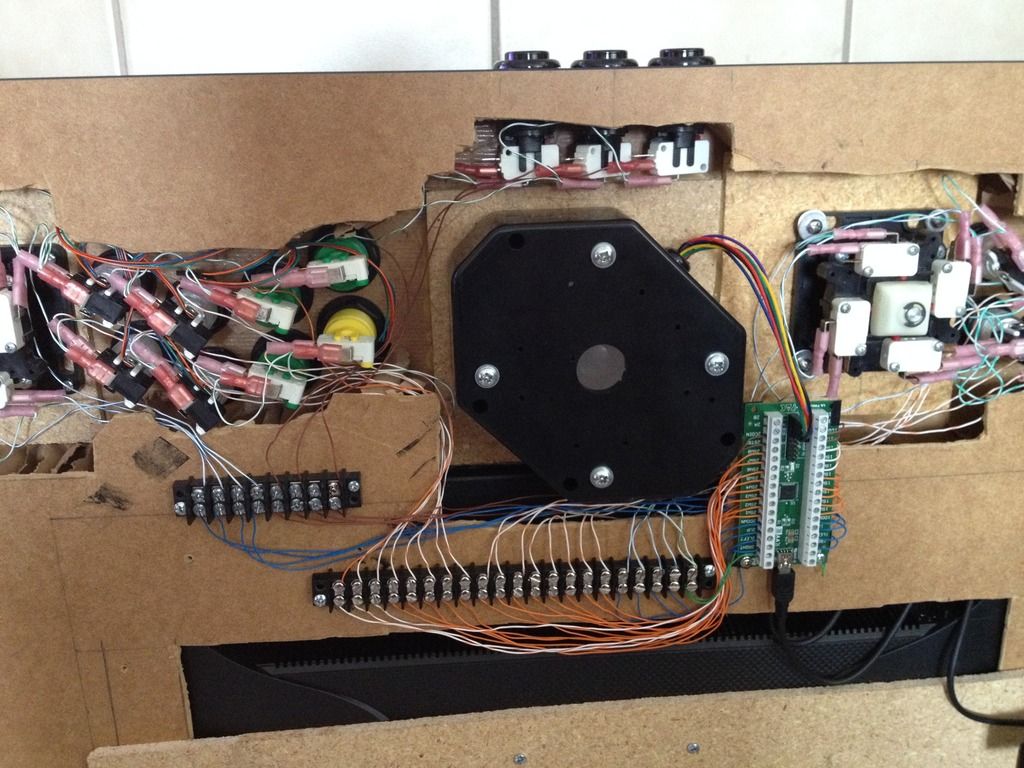
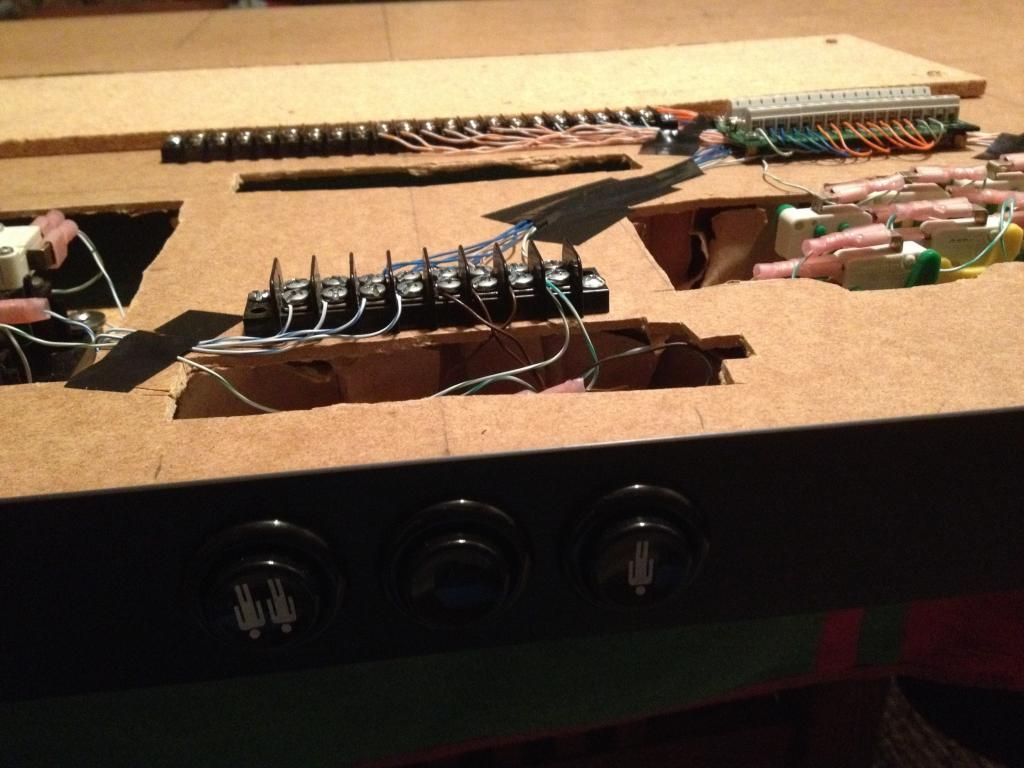
Here is a close up of the wiring and trackball.
>! 
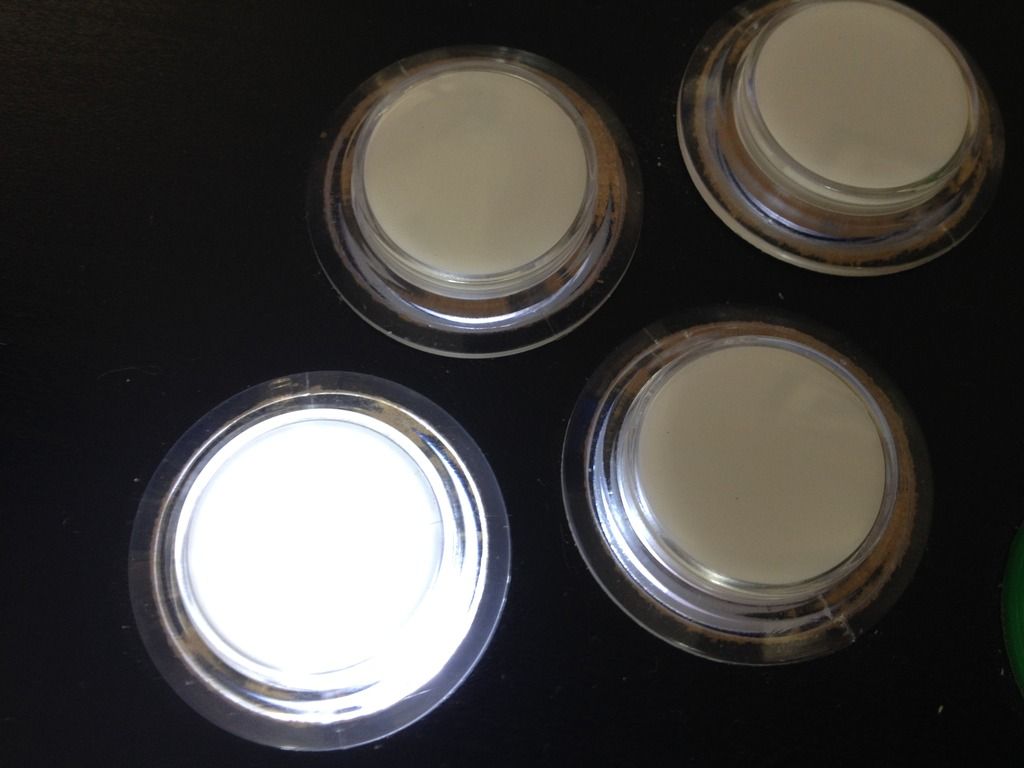
I bought a trackball that can light up. Unfortunately I ran out of money to get the light for the trackball and buttons. Once i get the light, i can make the buttons and trackball light up any color i want. There is a cool program that you can run that does really cool effects for the lights. You can also set up the buttons to light which buttons are needed for that particular game.
Here is the trackball without a light.
>! 
Here is the trackball with a flashlight under it.
>! 
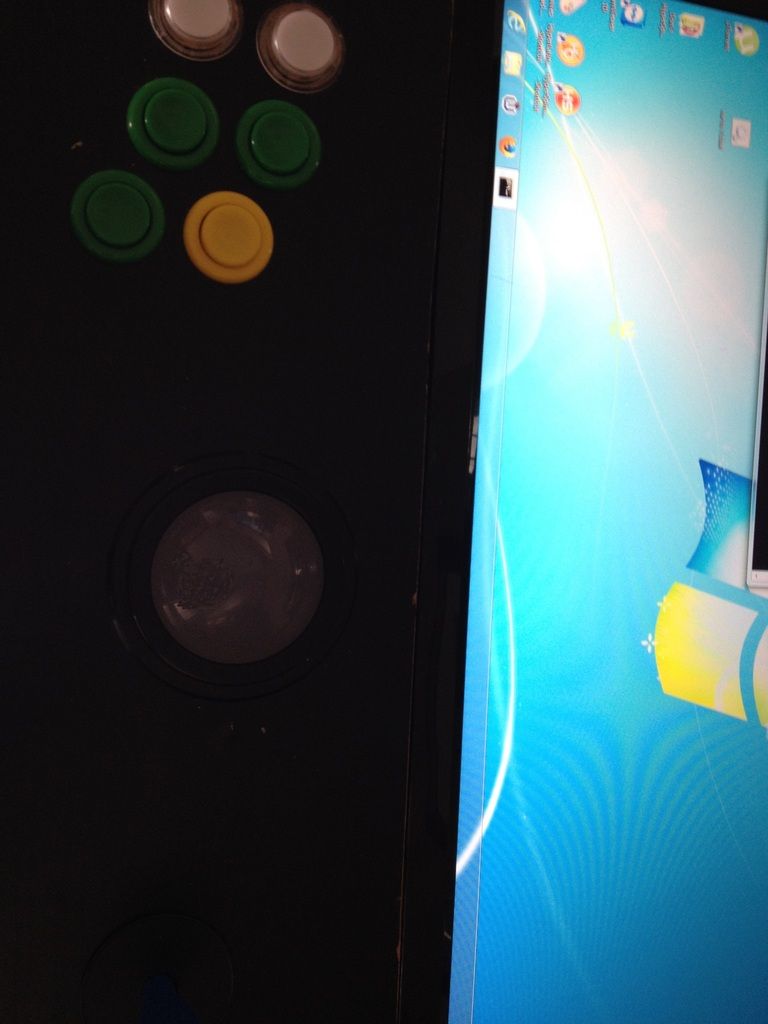
Here is one of the buttons lit up.
>! 
Close up of the lit button.
>! 
Here is the table with the emulator launcher running. You can see some of the other emulators on the right hand side of the screen.
>! 
A more zoomed out view.
>! 
@Bud you mean these? B) ;)
I would show you them on my hd, but my computer went to sleep and i can't remote into it right now :(
>! 
Unfortunately there isn't really an emulator that will play them right now, but they are getting close. -
Great job Dxxknight. It looks really nice!
The only thing, and it might just be me, but it's hard to distinguish the people. To me they seem to blend in with the background. I'm not sure how you would fix that, if it is even an issue. I love the look of everything, i just wish the characters stood out more. -
I removed the posts that were not productive to this thread.
 -
https://www.youtube.com/watch?v=N1Hs2AQwDgA
-
i have read your article and would like to subscribe to your newsletter.
-
Drakkie you still working at the Karaoke bar?
Did you get you house finished? -
Translate your post or i will move it to the different language section.
-
I think if the person that created the mod wants to charge for his work then that is his prerogative.
I rarely if ever purchase additional content, and the last time i dealt with Steam was with Portal 2, so I'm not familiar with what they are doing… But if Steam is charging for mods that were originally free, then that is bull.
I cant stand dlc... maybe i'm just old school, but to me it seems like companies are more interested in milking every drop out of games now. It used to be you bought the game and that was it. You had to wait until the next FULL game. Everything that you could get in the game was already included. I can see charging dlc for new missions, or a bunch of maps, as that is similar to a follow up game, but as an example if i buy Mortal Kombat, i should get all the fighters, and not have to buy the others as individual characters. -
Marsh… I'm probably the only one left that remembers the old people.
Whatever happened to Pickle :( -
https://www.youtube.com/watch?v=3cyGoZHduuE
-
Bacon
-
Bacon
-
Here is all of my emulation.. They are all 100%, and i have Dreamcast, and PS1 on the way.
There is no way i will ever scratch playing all of them… but they are like pokemon to me!
I also have apple IIe and few other systems that I have not transferred over yet.
 -
Not sure exactly how you do it since i see more options than you… but i marked it resolved for you.
-
Hey Kreator! I'm so happy to see you still around!
Your game looks great! I hope it all works out for you.
Check out munchkin for ideas as Strafe said. it has some funny items, equipment, and armor. It's based on rpg, but is pretty funny.
You're a clever guy and I'm sure you'll be able to make this into a great game! Keep up the good work! -
BONE my love!!! it's great to see you!
I miss our shenanigans! :(
I hope you are well! :) -
I've been wanting to build an arcade cabinet, but due to time, laziness, and space issues I never got around to making one. Recently i got a bug up my butt, and decided i was going to do it. I searched around and came across this.

I decided that will work great… i can use it as a table and for an arcade system.
I went to Ikea and bought this table.

It was $39 on sale for$33\. I figured if i screw this up, im not out a lot of money.
This is an easy table to hack… it is actually hollow, and has a carboard honeycomb inside to keep it sturdy.
I am not a skilled craftsman, but I am pretty handy. I think I could do some pretty cool projects if I actually had the correct tools and supplies.
Anyways here's my first attempt at making an arcade table.
Tools.
All I've needed for this project is a large ruler... I use a level. A utility knife. A 29mm hole saw. A drill. A small ruler (I got a level T square thing, but either I'm too much of a ditz to figure out how to use it, or it is broken. It didnt help me make straight lines), and some clamps.
Here is my level, utility knife, and clamps...
>! 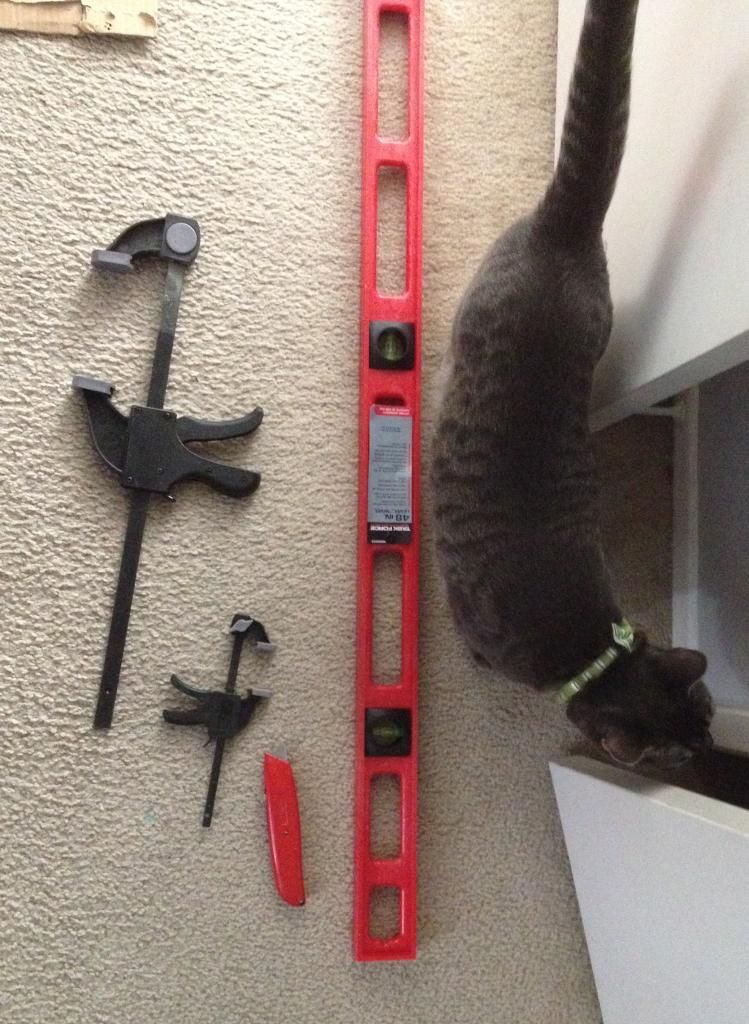
My cat had to inspect EVERYTHING!
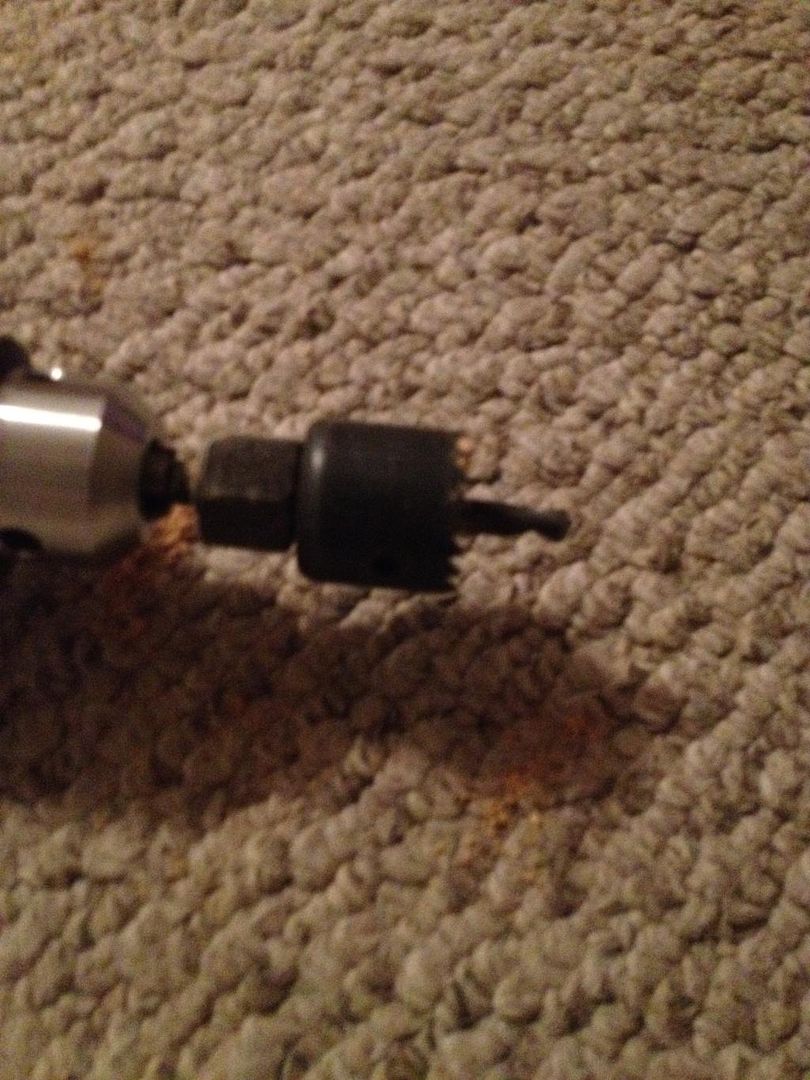
Here is my hole saw
>! 
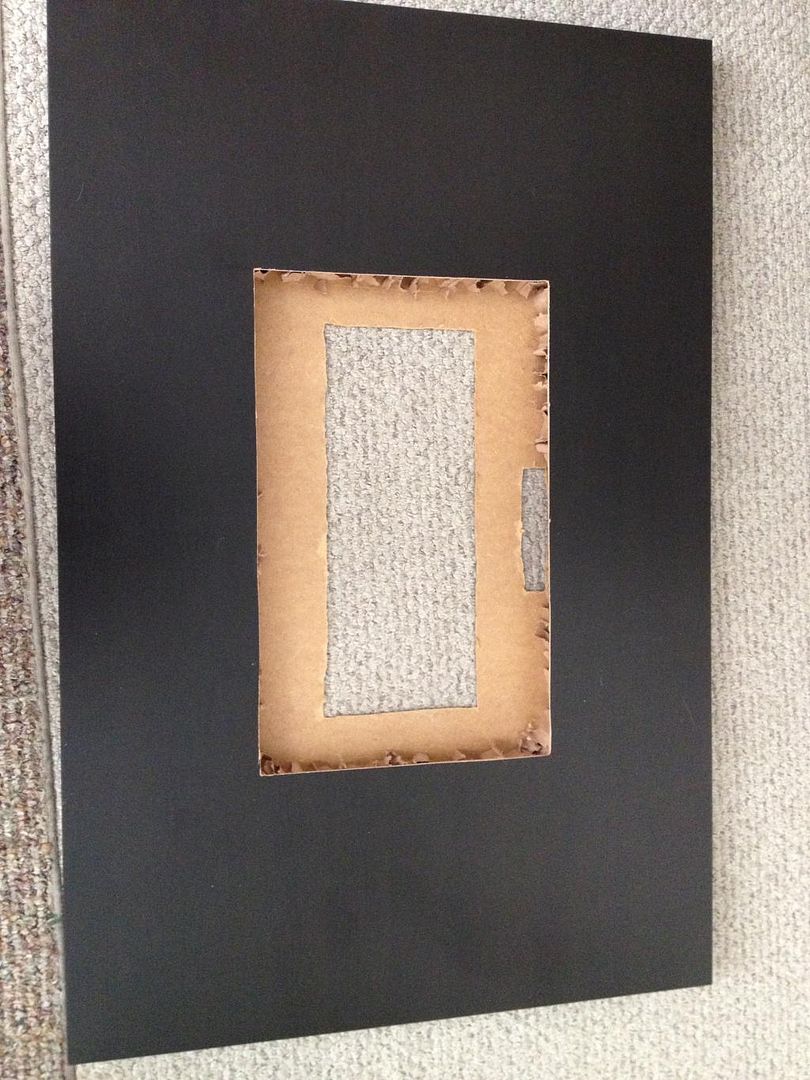
first i found the middle of the table, and then the middle of my monitor. I subtracted half the length and width of my montor from the center of the table in all directions, and cut out the hole for the monitor.
Here you can see the inside of the table. The top and bottom of the table is so thin you can use a utility knife to cut through it. At first i tried using my level to cut a straight line by running the knife along it a few times, but it eventually was easier to just plunge the knife into the tabe. If you have a steady hand and do small cuts you can drag the knife through the table. I wouldnt recomend doing that on the top though… the knife can easily slip or go off your line and then you are screwed. You can see the cardboard that supports the table. My monitor was just a little bit larger than the depth of the table so i had to cut a hole in the bottom so it would sit flush.
>! 
I went to this site to get a layout of arcade joystics and buttons. I went with the japanese arcade version which has the buttons curve to your hand. Ultimately either my measuring skills are not good or thier plans are off a little.. but it is a great place to start.
[http://www.slagcoin.com/joystick/layout.html](http://www.slagcoin.com/joystick/layout.html)
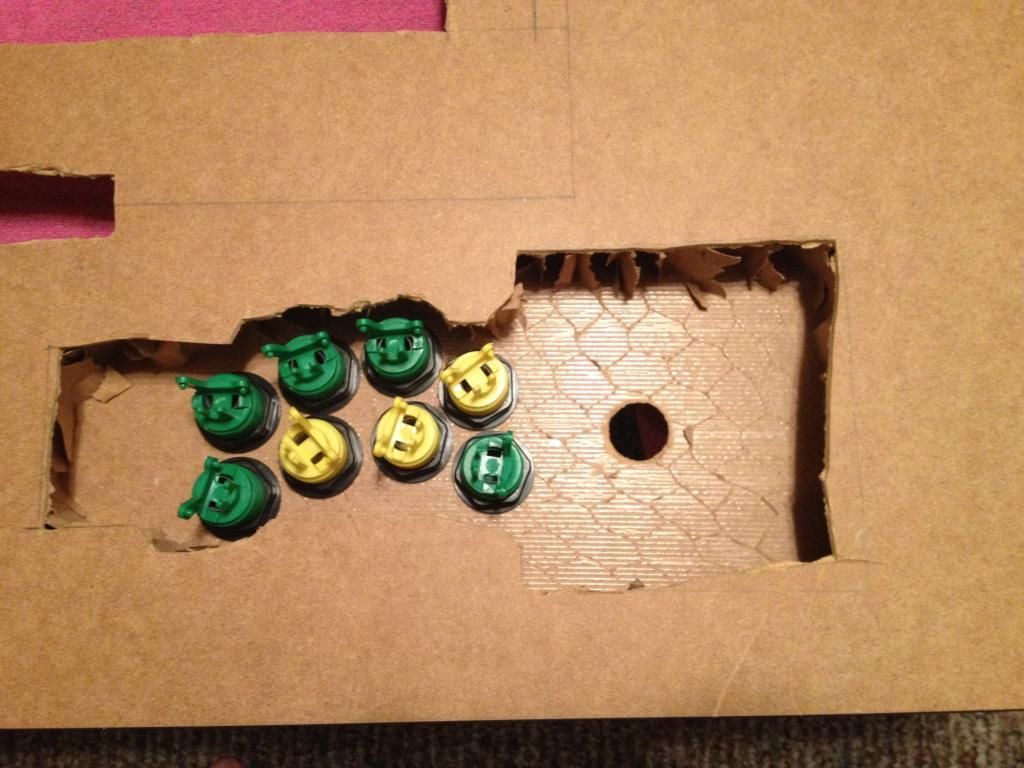
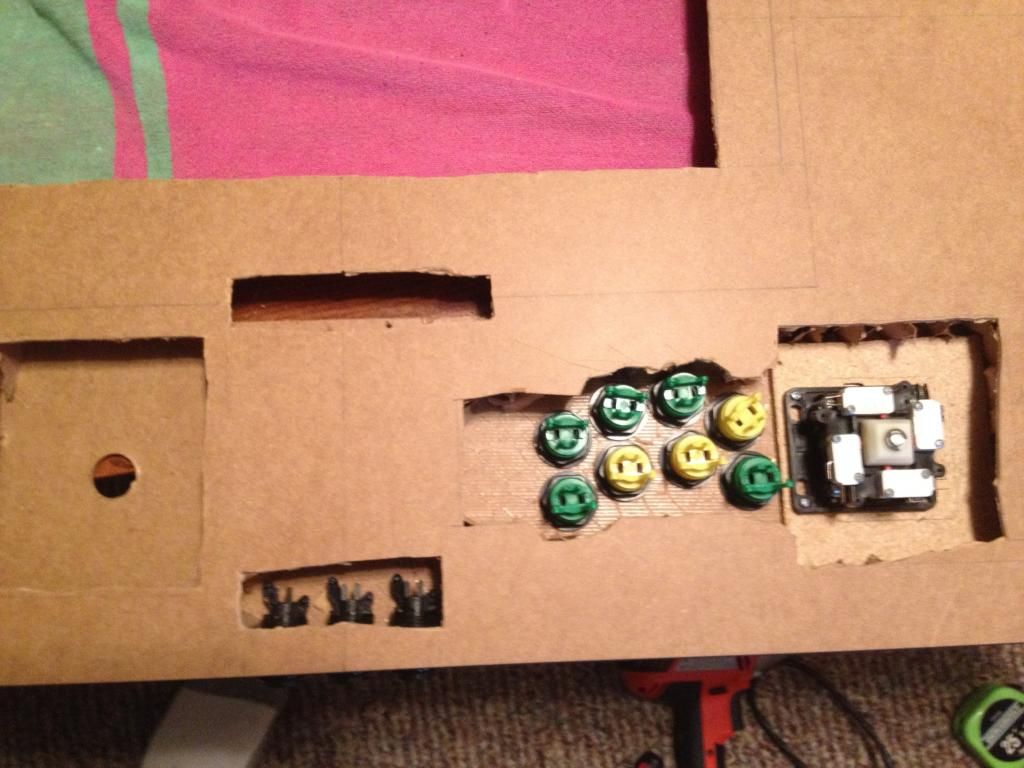
Before i did any drilling or marking on my table I made a mock up on a piece of cardboard. This is how i found out my buttons were off slightly.
>! 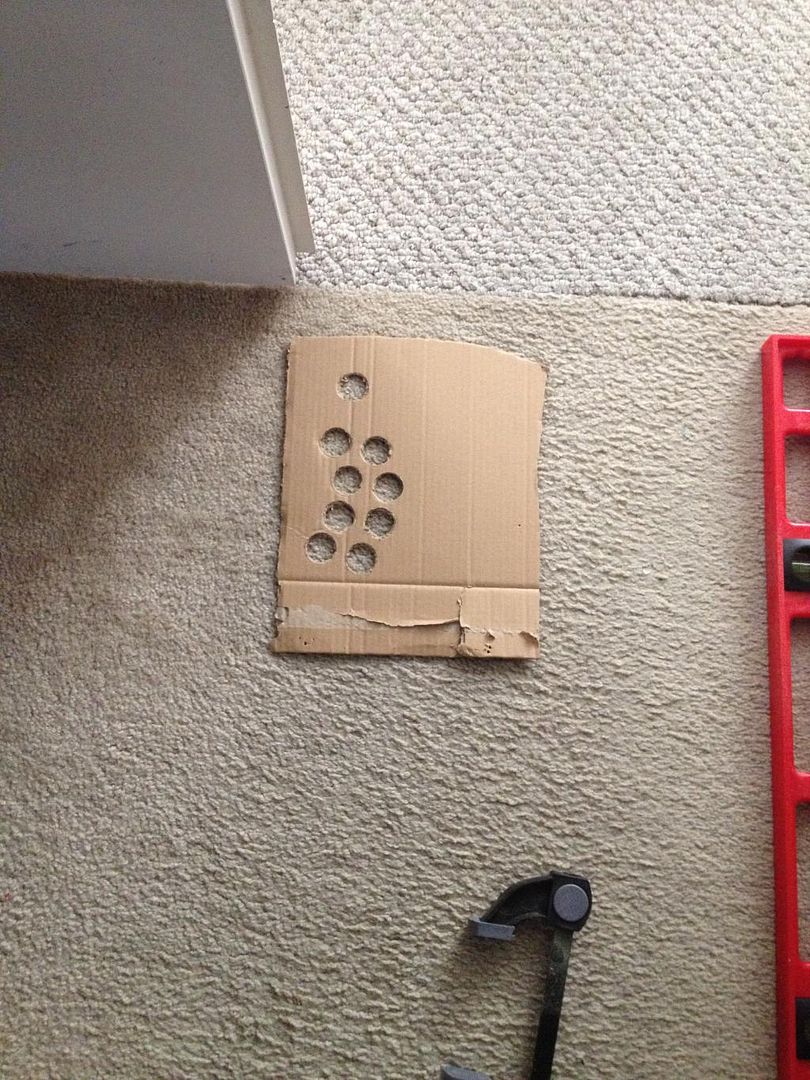
On the back of the buttons is a nut that screws on to hold the button in place. This nut is has a rim slightly larger than the button so if you are off they nuts will over lap. it could be fine, but I just readjusted the buttons slightly when it came time to actually drill.
A long time ago I made an arcade joystic. I had two joysticks, and a few buttons that i was able to use for this project. Unfortunately I need to buy some more buttons to have the second player actually work.
Here is my initial joystick. It is definatly not pretty, but it came out well for scrounging material. I took apart an old keyboard, and soildered wires to the connections, and then mapped out the entire keyboard. This worked pretty well, but unfortunately if you press to many buttons at once you "ghost" the keys, since multiple keys use the same circuit. I didnt have the right size drill bit so I had to bore it out… that's why the holes are all chewed up. Once again my cat had to make sure everything was ok.
>! 
Here is the back side with some wiring still intact. I used speaker wire since that was all i had. You can see my hacked keyboard module. The wire i used to attach to the keyboard was an IDE cable. For you youngins… that is what you used to use to connect your hard drive and cd drive to the motherboard.
>! 
Everything look good Smokey…. good lets move on.
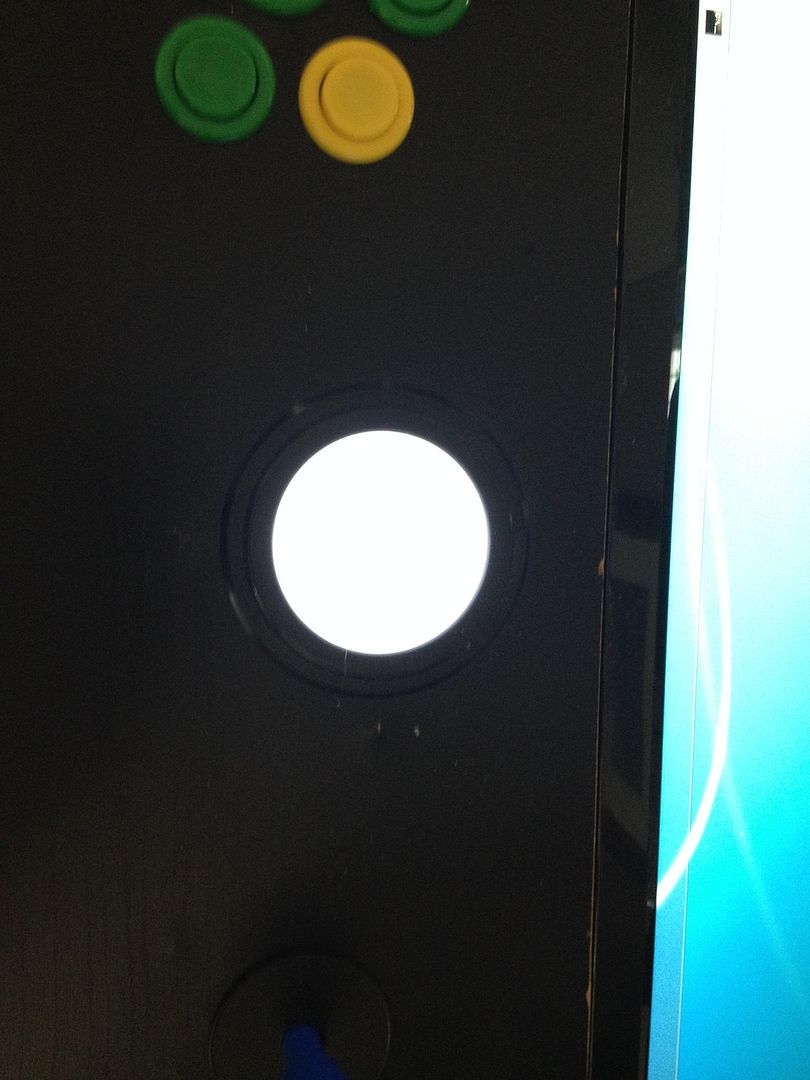
I drilled all my button holes, and the hole for the joystick. The buttons are too large and stick out the underside of the table a little. the small hole to the top left is so i can get to the power button and brightness of the monitor if needed. it is also where the power cable and vga cable will be fed through.
>! 
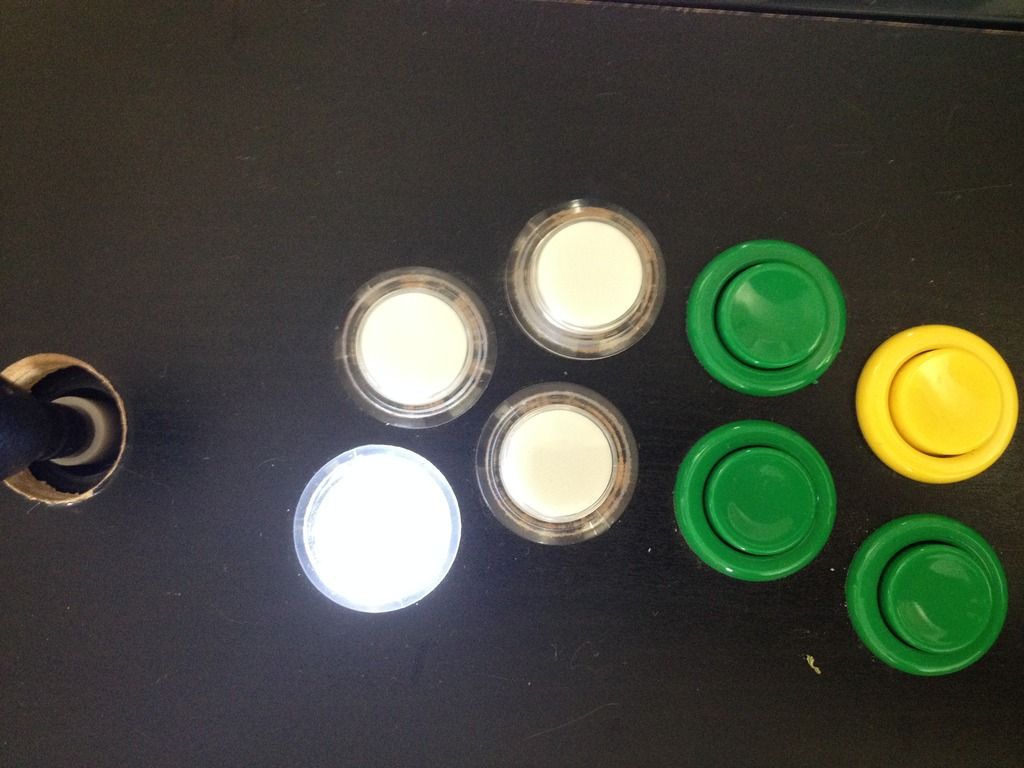
Here you can see the entire panel. The thickness of the top of the table is really thin so i took a piece of plywood and glued it to the table, then i mounted the joystick to it. Make sure you get clamps that are deep and wide enough to hold down your board. the stupid clamps i got were too small! :( I had to use weights from a barbell to hold the wood down over night. I drilled button holes in the side of the table for player 1, player 2, and insert coin. I just drilled the hole for player 2.
>! 
Here is everything wired. I could have hacked a keyboard again, but since i want this to be a permanent nice piece I got an Ipac2\. The ipac is a keyboard encoder that does not cause ghosting. they have different sizes. The 2 allows for 2 players with 4 buttons each, and i think there are 4 extra buttons along with the start and coin buttons. There is an ipac 4 wich supports 4 players, and an ultimate pac or something like that wich has a few less buttons than the 4, but supports led lights. You can buy buttons that you can program for certian games that will light up. Eventually i want to have 4 player, so i might get the ultimate, but it was a little expensive for me right now. For the wiring, i stripped the casing off an ethernet cable, and use the wire inside. if you can find a solid copper wire ethernet cable that works really good. The braided ethernet cable is ok. I used blue for the joysticks, brown for the start/coin, orange for the buttons, green for ground. I think the different colors look nice, and will help with trouble shooting.
>! 
you can get the ipac, joystics, and buttons here.
[http://www.ultimarc.com/ipac1.html](http://www.ultimarc.com/ipac1.html)
Here are the start buttons, and coin button.
>! 
Here is everything all wired. The board across the back is what i am using to mount the monitor to. Granted the monitor is just resting inside the table, but i wante it to be sturdy.
>! 
I'm hoping to get the computer mounted tonight and get it all finished tonight. I'll post more pics when its done.
If you have any questions on building one of these let me know. :wub: ^_^ -
> Your daughter is disabled and yet you think having red spots in your face is a PROBLEM?? Can you explain to me why is acne a problem? What is a PROBLEM for you???
>
> You didn't even have acne and still you went to the doctor aiming for the "perfect skin" when you were younger, and you took a drug to achieve it. And now look at you, a few years later, now you're having surgery. **Thanks for proving my point.** Hope your ineptitude has convinced Crest that he shouldn't be obsessed about it.
How the hell does using acne cream when he was little relate to Doug having surgery now? -
I dont know much about hardware. I've always been crafty and built things… I used to *ahem* liberate wood and stuff when they were building houses near me and make cages for snakes and lizards, and other crafts... they were't pretty but they worked. Marsh i'll take pics and give you the info of the tools and parts I used and make a topic for you.
-
I got the hole cut out for the monitor, but I'm bummed. My hand slipped as i was cutting the hole, and I made a big scratch on the table. Thankfull it's black so i think i can just color it with a permanent marker. I did pretty good at the measurements which is not a strong point for me… i got the hight perfect, its's a nice snug fit, but i undershot the width. I need to cut a little bit more out to make the monitor fit. I guess cutting too little is better than cutting too much!
Next is drilling the holes for the buttons. This has been my biggest nightmare because this is where my measurement skills come into play. I made a mockup on a piece of cardboard, and i got close but some of the nuts on the buttons overlap. Ultimately this can be ok... but I am somewhat of a profectionest and it really bugs me.
I'll post the final product when done.
Word filter
in Admin Zone
Posted
I did not change the words into something else as I'm not sure how serious you are making this site, so the words should change to ****
Here are the following words i added. It appears that the the filter is not case sensitive.
fuck*
shit*
bitch*