Linkmegax Posted June 13, 2012 Author Share Posted June 13, 2012 I couldn't help but create an account on here when I saw that the only tutorial for creating animated map tiles required server side changes and sent packets to the client constantly. I'm going to start putting in some useful tutorials here but I'll start with this one for now. Questions and comments are always welcome.Warning! These changes will force you to delete all of your server maps since it changes the maximum number of layers on a map. If someone knows of a way to create a tool to automatically parse in extra layers into an existing saved map then please make one.This is for 2 frame animations of type Mask and Fring. I will explain how to modify this at the end of the tutorial but keep this in mind as you read through.I don't claim to have the same baseline code as everyone else so if my sub names look different than yours then forgive me. Also I don't plan on putting up any pictures but I tried to be descriptive enough so that you wouldn't need them. If my code snippets have terrible looking spacing then I'm sorry, but hopefully you can just copy/paste them.== Server Side ==This change is only to save maps. No animation handling is done on the server.Open modEnumerations and find```Public Enum MapLayer```Before Layer_Count add these to the enumeration``` MaskAnim FringeAnim```Your enumeration should now look similar to this```' Layers in a mapPublic Enum MapLayer Ground = 1 Mask Mask2 Fringe Fringe2 MaskAnim FringeAnim ' Make sure Layer_Count is below everything else Layer_CountEnd Enum```Simple right? You are now done with server side changes== Client Side ==Open frmEditor_Map and bring to the top fraLayers.You should see five radio buttons and the caption for the last one should be Fringe2 and will be named optLayer(5). Copy/Paste one of these radio buttons or create a new one and name it optLayer and set the index to 6, hence it will be called optLayer(6). Change the caption to read M.Anim (Mask Animation).Create another radio button the same way and name it optLayer with an index of 7 so it will show as optLayer(7). Change the caption to read F. Anim (Fringe Animation).Now for the actual code changes.Do the exact same thing you did on the server to the client. Open modEnumerations and add to the same fields to the same enumeration so it looks similar to this```Public Enum MapLayer Ground = 1 Mask Mask2 Fringe Fringe2 MaskAnim FringeAnim ' Make sure Layer_Count is below everything else Layer_CountEnd Enum```Your MapLayer enumeration on the server and client should be identical.Now for the part that does the real work.Open up modDirectDraw7 and find this sub```Public Sub BltMapTile(ByVal x As Long, ByVal y As Long)```In that sub you will see a block of code that looks like this or similar. Pay attention to where I added some comment lines that say "Paste New Code Here"```With Map.Tile(x, y) For i = MapLayer.Ground To MapLayer.Mask2 ' skip tile? If (.Layer(i).Tileset > 0 And .Layer(i).Tileset <= NumTileSets) And (.Layer(i).x > 0 Or .Layer(i).y > 0) Then ' sort out rec rec.top = .Layer(i).y * PIC_Y rec.Bottom = rec.top + PIC_Y rec.Left = .Layer(i).x * PIC_X rec.Right = rec.Left + PIC_X ' render Call Engine_BltFast(ConvertMapX(x * PIC_X), ConvertMapY(y * PIC_Y), DDS_Tileset(.Layer(i).Tileset), rec, DDBLTFAST_WAIT Or DDBLTFAST_SRCCOLORKEY) End If Next '################### '## Paste New Code Here ## '################### End With```Where I put the "Paste New Code Here", paste this code``` If GetTickCount Mod 1000 < 500 Then ' skip tile? If (.Layer(MapLayer.MaskAnim).Tileset > 0 And .Layer(MapLayer.MaskAnim).Tileset <= NumTileSets) And (.Layer(MapLayer.MaskAnim).x > 0 Or .Layer(MapLayer.MaskAnim).y > 0) Then ' sort out rec rec.top = .Layer(MapLayer.MaskAnim).y * PIC_Y rec.Bottom = rec.top + PIC_Y rec.Left = .Layer(MapLayer.MaskAnim).x * PIC_X rec.Right = rec.Left + PIC_X ' render Call Engine_BltFast(ConvertMapX(x * PIC_X), ConvertMapY(y * PIC_Y), DDS_Tileset(.Layer(MapLayer.MaskAnim).Tileset), rec, DDBLTFAST_WAIT Or DDBLTFAST_SRCCOLORKEY) End If End If```This will create an animation layer above your Mask2 layer. For every full second, your normal mask or mask2 tile will remain for the entire second, but the mask animation layer will appear on top of (covering) your normal mask tile for the first half of the second, hence making a two frame animation. At the end I will go into more details on how to change the timing and add more animation frames.Go to the next sub, which should be this```Public Sub BltMapFringeTile(ByVal x As Long, ByVal y As Long)```You will do the exact same thing here as in the previous sub but you will replace MaskAnim with FringeAnim. Paste the following code after "Next" and before "End While"```If GetTickCount Mod 1000 < 500 Then ' skip tile? If (.Layer(MapLayer.FringeAnim).Tileset > 0 And .Layer(MapLayer.FringeAnim).Tileset <= NumTileSets) And (.Layer(MapLayer.FringeAnim).x > 0 Or .Layer(MapLayer.FringeAnim).y > 0) Then ' sort out rec rec.top = .Layer(MapLayer.FringeAnim).y * PIC_Y rec.Bottom = rec.top + PIC_Y rec.Left = .Layer(MapLayer.FringeAnim).x * PIC_X rec.Right = rec.Left + PIC_X ' render Call Engine_BltFast(ConvertMapX(x * PIC_X), ConvertMapY(y * PIC_Y), DDS_Tileset(.Layer(MapLayer.FringeAnim).Tileset), rec, DDBLTFAST_WAIT Or DDBLTFAST_SRCCOLORKEY) End If End If```This will do the same thing as the Mask Animation above, but instead of being a Mask tile above Mask2, it will be a Fringe tile above the Fringe2 layer.== How to Use==To use this is simple. First create your map as you would without animations. A good map to start with is one with a body of water in it. Pick a tile on your existing map that you want to animate. Open your map editor and select the tile that you want to be the first frame of your animation. This tile should be similar but slightly different than your existing tile that you want to animate. A water tile is a good one to start with. Select your new layer radio button with the caption M. Anim. Place the tile. You should now see the tile flash in half second intervals on top of your normal Mask tile creating a 2 frame, one second animation. I use this primarily for water, but also for blowing grassFor fringe animations do the exact same thing as with mask animations but use the fringe radio button on top of a normal Fringe tile. I like to use these for flames on torches and flags or windmills.== How to Modify ==To change the rate at which the frames change simply find this line in both subs that you modified```If GetTickCount Mod 1000 < 500 Then```Change the 1000 to your new time (1000 = 1 second) and change the 500 to be half of whatever your new animation time is. So if you want a very slow animation that takes 2 seconds, your code would look like this```If GetTickCount Mod 2000 < 1000 Then```If you want to modify the number of animation frames I recommend changing the number of animation frames to even numbers like 4 (that should be plenty). If you do odd numbers like 3 or 5 then if you try to do an animation with only 2 frames then it will look choppy, but with 4 frames you can just use the same tile for frames 1 and 3 and the other tile for frames 2 and 4 and it will still look good.I will assume you are going for 4 animation frames. If not then read between the lines to figure it out. If you can't do that on your own then just stick with the 2 frame tutorial.To change the animation frame number go to the enum on the server and client and add new enum values for Mask and Fringe like this```' Layers in a mapPublic Enum MapLayer Ground = 1 Mask Mask2 Fringe Fringe2 MaskAnim MaskAnim2 MaskAnim3 FringeAnim FringeAnim2 FringeAnim3 ' Make sure Layer_Count is below everything else Layer_CountEnd Enum```Remember to change the enum on the server and client side so they are identical. Also remember that your normal mask or fringe layer makes up one of the animation frames so your number of animation layers will be the number of animation frames minus 1.Open frmEditor_Map and add new radio buttons for the new animation frames. Make sure your Mask buttons come first and have index values 6 to 8 and your Fringe buttons come last and have index values 9 to 11.In the first sub in the location where I said to "Paste New Code Here", paste this code instead.```If GetTickCount Mod 1000 < 250 Then ' skip tile? If (.Layer(MapLayer.MaskAnim).Tileset > 0 And .Layer(MapLayer.MaskAnim).Tileset <= NumTileSets) And (.Layer(MapLayer.MaskAnim).x > 0 Or .Layer(MapLayer.MaskAnim).y > 0) Then ' sort out rec rec.top = .Layer(MapLayer.MaskAnim).y * PIC_Y rec.Bottom = rec.top + PIC_Y rec.Left = .Layer(MapLayer.MaskAnim).x * PIC_X rec.Right = rec.Left + PIC_X ' render Call Engine_BltFast(ConvertMapX(x * PIC_X), ConvertMapY(y * PIC_Y), DDS_Tileset(.Layer(MapLayer.MaskAnim).Tileset), rec, DDBLTFAST_WAIT Or DDBLTFAST_SRCCOLORKEY) End If Else If GetTickCount Mod 1000 < 500 Then ' skip tile? If (.Layer(MapLayer.MaskAnim2).Tileset > 0 And .Layer(MapLayer.MaskAnim2).Tileset <= NumTileSets) And (.Layer(MapLayer.MaskAnim2).x > 0 Or .Layer(MapLayer.MaskAnim2).y > 0) Then ' sort out rec rec.top = .Layer(MapLayer.MaskAnim2).y * PIC_Y rec.Bottom = rec.top + PIC_Y rec.Left = .Layer(MapLayer.MaskAnim2).x * PIC_X rec.Right = rec.Left + PIC_X ' render Call Engine_BltFast(ConvertMapX(x * PIC_X), ConvertMapY(y * PIC_Y), DDS_Tileset(.Layer(MapLayer.MaskAnim2).Tileset), rec, DDBLTFAST_WAIT Or DDBLTFAST_SRCCOLORKEY) End If Else If GetTickCount Mod 1000 < 750 Then ' skip tile? If (.Layer(MapLayer.MaskAnim3).Tileset > 0 And .Layer(MapLayer.MaskAnim3).Tileset <= NumTileSets) And (.Layer(MapLayer.MaskAnim3).x > 0 Or .Layer(MapLayer.MaskAnim3).y > 0) Then ' sort out rec rec.top = .Layer(MapLayer.MaskAnim3).y * PIC_Y rec.Bottom = rec.top + PIC_Y rec.Left = .Layer(MapLayer.MaskAnim3).x * PIC_X rec.Right = rec.Left + PIC_X ' render Call Engine_BltFast(ConvertMapX(x * PIC_X), ConvertMapY(y * PIC_Y), DDS_Tileset(.Layer(MapLayer.MaskAnim3).Tileset), rec, DDBLTFAST_WAIT Or DDBLTFAST_SRCCOLORKEY) End If End If```For the Fringe paste the same thing where the fringe code would go but change all the MaskAnim to FringeAnim (there are 21 in all, 7 for each frame).If you want to change the frame rate of this 4 frame animation then change 1000 to whatever you want your new animation time to be (1000 = 1 second). Divide that number by your number of frames and that is how much to increment by when you change the 250, 500, and 750 values I put here. So for a 2 second animation use 2000 and 500, 1000, 1500 for your values.That should do it. If you have any questions or comments feel free to leave them. Link to comment Share on other sites More sharing options...
jcsnider Posted June 13, 2012 Share Posted June 13, 2012 Hey guys this person is contributing!Welcome to the forum! Tutorial looks nice and code seems legit, good work! Link to comment Share on other sites More sharing options...
Linkmegax Posted June 13, 2012 Author Share Posted June 13, 2012 Thanks. I just made this change on my own game that I'm starting and figured it was so easy I might as well write a tutorial on it since a good implementation was lacking here.I saw you had a few tutorials on making pets, but they were all just paperdoll items that look like pets. It may be a while but once I start making the changes in my own game I'll probably write a tutorial on how to make real pets that actually follow you around, walk to where you tell them to, and can help attack enemies you target. Link to comment Share on other sites More sharing options...
jcsnider Posted June 13, 2012 Share Posted June 13, 2012 @Linkmegax:> -snip-> > I saw you had a few tutorials on making pets, but they were all just paperdoll items that look like pets. It may be a while but once I start making the changes in my own game I'll probably write a tutorial on how to make real pets that actually follow you around, walk to where you tell them to, and can help attack enemies you target.I don't remember ever posting a tutorial for that but if I did, it was because I was making a Pokemon style game and there was no need for actual Pet AI, all they were supposed to do was follow… it must have been a long time ago XDXDI actually created a real pet system at one point...http://www.youtube.com/watch?v=k-WIzzwCTg0&But never released the code to the community. You can look at Lightnings, I have not used it but it is popular among the community. Link to comment Share on other sites More sharing options...
Justn Posted June 13, 2012 Share Posted June 13, 2012 Very nice and easy to follow tutorial completely dummy proof thanks for sharing an actual animation system bro can't wait to try it out tomorrow :) also here is the link for the pet system Jc was referring too http://www.touchofdeathforums.com/smf/index.php/topic,69521.0/topicseen.html Link to comment Share on other sites More sharing options...
tslusny Posted June 13, 2012 Share Posted June 13, 2012 @jcsnider:> I don't remember ever posting a tutorial for that but if I did, it was because I was making a Pokemon style game and there was no need for actual Pet AI, all they were supposed to do was follow… it must have been a long time ago XDXD> > I actually created a real pet system at one point...> http://www.youtube.com/watch?v=k-WIzzwCTg0&> > But never released the code to the community. You can look at Lightnings, I have not used it but it is popular among the community.Lighting pet system needs alot of fixes, its bugged alot ( it hink caching for pets is biggest problem)And wow your pet system is epic Link to comment Share on other sites More sharing options...
Growlith1223 Posted June 13, 2012 Share Posted June 13, 2012 Ducking nice tutorial!!!!This is exactly what i was wanting! :DEDIT: You do not have to delete your maps since you are not editing the mapRecthe layers are just done through a small Type. Link to comment Share on other sites More sharing options...
Matt Posted June 13, 2012 Share Posted June 13, 2012 Amazing addition! Welcome to the community! Link to comment Share on other sites More sharing options...
Linkmegax Posted June 13, 2012 Author Share Posted June 13, 2012 Thanks again. I'm glad people like this.Thanks for posting that link to Lightning's pet system. That is definitely more like the pet system I used to have on my old game. Maybe my next tutorial will be for a day/night and lighting system instead once I get that started.ZeroX8, when I made this mod on my own project I had to delete all the maps on the server side when I started the server because your Layer_Count value increases so when you try to load the maps when the server initializes it goes out of bounds. Once I deleted my old maps (they were already empty anyways) then the server was able to create new empty maps and initialized just fine. If anyone has tried this with their existing maps and has gotten it to work without having to delete their old maps then let me know since that would be very good news. Link to comment Share on other sites More sharing options...
abhi2011 Posted June 13, 2012 Share Posted June 13, 2012 Wait what this does is like there will be movement in tiles in the map right? Such as swaying flags and stuff. If so you read my thoughts I was actually thinking of someone doing that or me trying to do it. Link to comment Share on other sites More sharing options...
Linkmegax Posted June 14, 2012 Author Share Posted June 14, 2012 I just realized that the normal Mask or Fringe tiles can be used as one frame of the animation. It saves a little work to have to create one less animation tile for each layer but otherwise it does the same thing. I'll be updating the tutorial to use this slightly easier method.I have to go to work so I will modify the How to Modify section to match the rest of the tutorial updates later tonight. Link to comment Share on other sites More sharing options...
JohnPony Posted June 14, 2012 Share Posted June 14, 2012 I do map animations slightly different. Rather then creating a whole new layer, i have a map attribute that handles animations, which allows animations made through the animation editor to be displayed on the map… But meh, that is just me. Link to comment Share on other sites More sharing options...
Linkmegax Posted June 15, 2012 Author Share Posted June 15, 2012 I suppose there are pros and cons to both methods. Using an attribute would allow the use of animations from the animation editor, which I assume would allow you to alter the frame rate and number of frames of the animation. On the down side if you wanted to animate a river you would have to fill your river with attribute tiles which would prevent you from using other types of attribute tiles in those same locations, and it would force you to use the directional block instead of a tile block if you don't want someone to walk on a location where an animation was placed.Using layers I can create an entire windmill simply by having a single windmill tileset and then a slightly altered copy of the windmill blades as part of that tile set so I can place all the tiles as a large set and still have a large animation that allows me to put other attribute tiles on the same locations and also fringe my windmill while having tall animated grass blowing beneath it and still place a shop or other attribute tile where they all overlap. Link to comment Share on other sites More sharing options...
hisherwin Posted June 20, 2012 Share Posted June 20, 2012 Thanks Thanks Thanks Thanks Thanks , I love this tut!!! It really help me alot , THANK You very much Link to comment Share on other sites More sharing options...
hisherwin Posted June 20, 2012 Share Posted June 20, 2012 There is a Problem here , On optLayer (6) is Fringe AnimationoptLayer (7) is not working ,How do i fixed it?Mask Animation is working as Fringe AnimationWhile Fringe Animation is not working. Link to comment Share on other sites More sharing options...
Joost Posted June 20, 2012 Share Posted June 20, 2012 Are you sure you deleted your maps? Sorry for giving the obv answer, but I can't see how anything else could be broken solely for you.(PS, making a converter isn't terribly difficult and there have been lots of people who made map converters for other stuff. I'm sure you can find a way around it w/ some research) Link to comment Share on other sites More sharing options...
YummyTomato Posted July 6, 2012 Share Posted July 6, 2012 I did everything you said (except for the How to Modify part) and I also deleted all the old map files but whenever I try to select the M.Anim or F.Anim choices, it selects the other layers as well, and they do not animate :(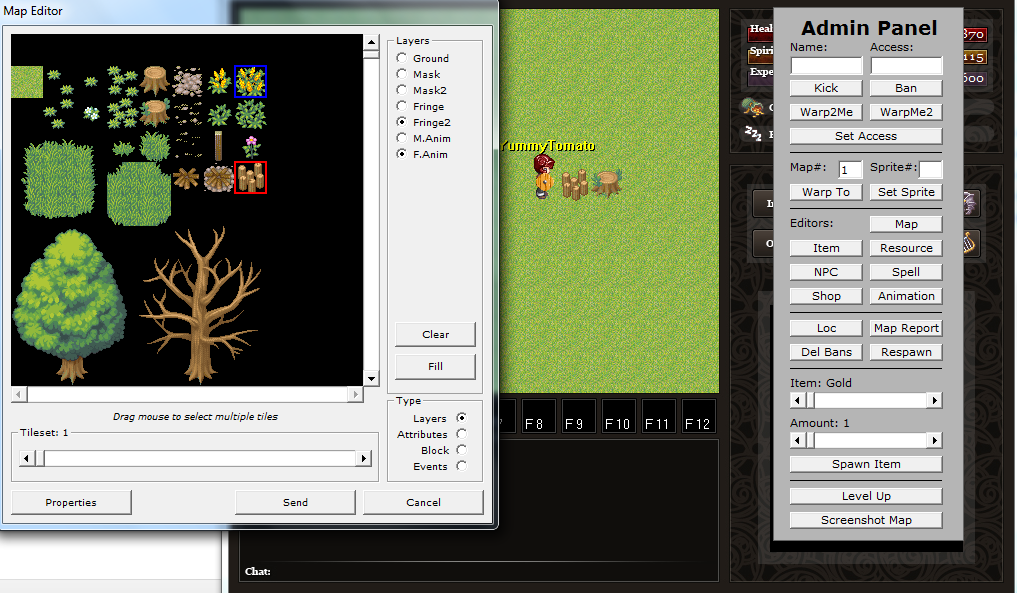 Link to comment Share on other sites More sharing options...
the star Posted July 9, 2012 Share Posted July 9, 2012 Good tutorial Link to comment Share on other sites More sharing options...
abhi2011 Posted July 9, 2012 Share Posted July 9, 2012 @YummyTomato:> I did everything you said (except for the How to Modify part) and I also deleted all the old map files but whenever I try to select the M.Anim or F.Anim choices, it selects the other layers as well, and they do not animate :(> > This tut is for EO 2.0 not EO ES. Link to comment Share on other sites More sharing options...
Justn Posted July 9, 2012 Share Posted July 9, 2012 @TheChoosenOne:> This tut is for EO 2.0 not EO ES.Works great for me… No edits required I'm using the four frame animations (part at the bottom) :) Link to comment Share on other sites More sharing options...
abhi2011 Posted July 9, 2012 Share Posted July 9, 2012 Doesn't the way how maps are handled change in ES? Link to comment Share on other sites More sharing options...
Justn Posted July 9, 2012 Share Posted July 9, 2012 But this tutorial really only affects how the mask and fringe layers are drawn.. nothing will interfere with the event system ;p Link to comment Share on other sites More sharing options...
abhi2011 Posted July 9, 2012 Share Posted July 9, 2012 My bad. Link to comment Share on other sites More sharing options...
Justn Posted July 9, 2012 Share Posted July 9, 2012 I think yummytomatoe just messed something up the wording the author used for the radio buttons had me kinda confused at first :/ but followed it step by step and it works very nice even on my older pc :))) Link to comment Share on other sites More sharing options...
vitorgeller Posted August 1, 2012 Share Posted August 1, 2012 Oh, I've figured out ;)Nice tutorial anyway :D Link to comment Share on other sites More sharing options...

Recommended Posts
Create an account or sign in to comment
You need to be a member in order to leave a comment
Create an account
Sign up for a new account in our community. It's easy!
Register a new accountSign in
Already have an account? Sign in here.
Sign In Now